Hostinger是一個成立於2004年、大眾點評4.4分(滿分5分)、價格較低的WordPress建站伺服器。 本文將詳細介紹:對比Hostinger的主機套餐、購買Hostinger的過程、使用Hostinger如何建站、基於Hostinger的網站速度測試等等。
Hostinger分了全球各種子網站,而且同配置主機價格也不一樣,所以難免眼花(我已經眼花了)。
Hostinger主機怎麼樣
我評測下來的總結是:不要買。 原因:(1)入門門檻低,隱藏收費坑,譬如SSL證書居然只有一個免費的,之後,每個收你82.99元。 (2)不穩定,下文有說; (3)備份功能堪稱雞肋,給你一個7天自動備份,但是你不能手動備份。
如果你堅持要買,且希望買5、6美元/月左右的主機架設網站,且對備份無所謂,不要買 Hostinger.com.hk 的,而是買 Hostinger.com 的 Business Shared Hosting 套餐,我買的 Hostinger.com.hk 的WordPress商業套餐,監控網站掉線的情況比較多(最近有讀者反饋同樣的情況),而我的一位架設網站客戶用的 Hostinger.com 的主機,就很少掉線(查看數據)。 這不排除是個例,所以你需要買了之後自己監控一下,掉線多就果斷退掉。
- 價格便宜(5分)
- 速度良好(4分)
- 功能較健全(4分):我常用的按需備份功能是沒有的,Staging功能也沒有,但可以用免費外掛程式UpdraftPlus WordPress Backup來替代
- 客服可能略慢(4分):之所以說可能,是因為我自己諮詢時,雖然提示1小時內聯繫我,但實際只等待了10分鐘。
- 正常運行時間 (? ):對比我用的Cloudways、SiteGround等等,我從 Hostinger.com.hk 買的主機的正常運行時間最差,掉線時間太長了、次數也多(掉線時網站會無法打開),而我的一位建站客戶用的 Hostinger.com 的主機,就很少掉線。
具體內容請看下文。
Hostinger主機套餐與性價對比
我買了 Hostinger.com.hk 的WordPress Hosting 2年,Hostinger.com 的Business shared hosting 2年進行對比。 下一段對比看著挺暈的,搞不懂主機商為嘛搞這麼多種套餐讓人眼花。。 大概就是為了讓你看不懂,稀里糊塗圖便宜買了它。。
Hostinger.com.hk 相比 Hostinger.com 便宜一些,譬如Business WordPress套餐,購買24個月的話,在 Hostinger.com.hk 賣39.99¥/月(≈6.21$),在 Hostinger.com 賣8.99$/月。
Hostinger適合我們wordpress建站的有兩個系列的主機:共用虛擬主機(Shared Hosting)和WordPress主機(WordPress Hosting)。
這兩類主機各有3種級別的套餐,共用虛擬主機(Shared Hosting)比WordPress主機(WordPress Hosting)的 同檔次套餐便宜一些,但功能我用起來都一樣啊(木有看到啥區別呀),兩種主機的同檔次套餐的核心配置是一樣的。
如下圖所示,我對比了 Hostinger.com 中兩者的頂配套餐,下圖中能看到價格與配置對比,價格不一樣,但配置一樣(雞賊)

在 Hostinger.com.hk 中的兩者對比如下:

共用虛擬主機和WordPress主機有什麼區別嗎?
共用虛擬主機與WordPress主機有啥區別嗎? 按官方說法是,後者是針對WordPress做過優化的,並且相同配置下,WordPress主機比虛擬主機貴。
我把兩種主機都買了同級別的:商業版虛擬主機、Business WordPress,對比了下主機面板後台,發現功能沒啥區別呀,只是在WordPress主機安裝WordPress時預設會安裝個Jetpack。
那Wordpress hosting和Shared hosting的區別是啥呢? 據我查詢,Wordpress hosting針對wordpress建站做過優化,而Shared hosting沒有這麼做,因為建站程式也不止只有Wordpress,Shared hosting也一樣能進行wordpress建站,同時適用範圍更廣泛,而Wordpress hosting針對WordPress建站更友好。 (其實用的時候我沒怎麼感覺出來,感覺都差不多)
如何購買Hostinger主機套餐
首先,我們點擊下方的按鈕進入官網,我建議買 hostinger.com 的Business Shared Hosting,原因我之前也說了,因為hk的主機掉線比較多,com的主機掉線極少。
在 Hostinger.com 的購買流程
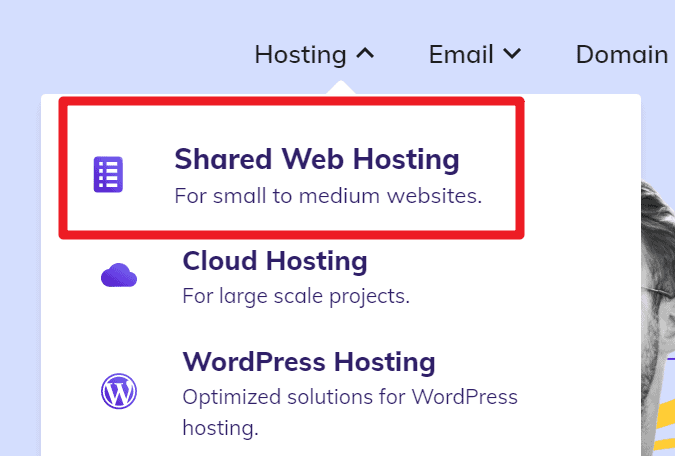
如下圖所示,我們在 hostinger.com 的官網菜單中找到shared web hosting並點擊進入
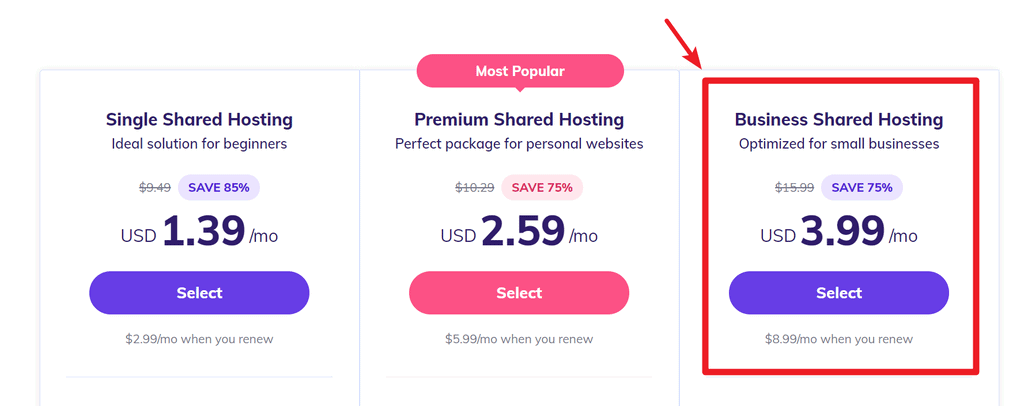
然後如下圖所示選擇business shared hosting套餐,因為只有它具備每日自動備份功能。
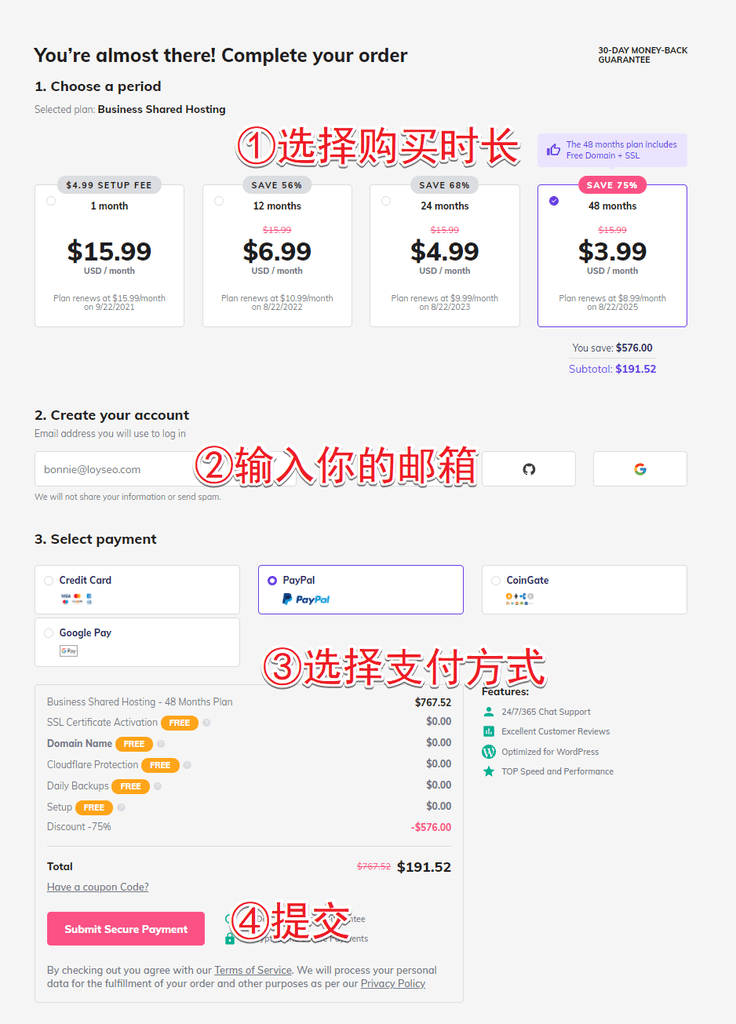
接下來,我們選擇購買時長、輸入註冊用的郵箱、選擇支付方式並點擊提交即可,在下圖的價格中我們能看到,隨著購買時間的增長,首次購買的價格折扣越來越低,到期后的續費價格雖然上漲,但也會隨著購買時間的增長而降低。 所以建議根據你的運營計劃,可以酌情考慮一次性購買2年或者4年。
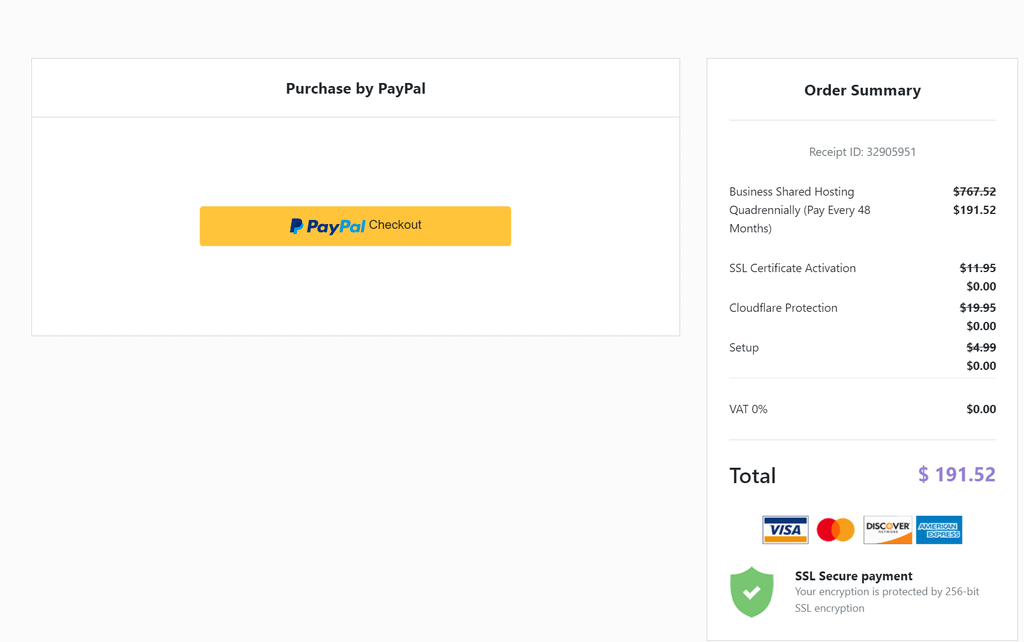
當提交后,你的郵箱裡會收到一封郵件,告知你驗證郵箱,當你點擊驗證郵箱時,會同時前往創建帳戶密碼的頁面。 此外,你也將跳轉到支付確認頁面,點擊下圖中的支付按鈕即可前往支付。 待你支付完成後,我們便可以跟隨新手指導創建網站了。
在 Hostinger.com.hk 的購買流程
按下圖所示,我們在 hostinger.com.hk 菜單的主機產品下點擊WordPress主機進入,然後點擊最熱門的Business WordPress下方的添加到購物車

接下來
- 選擇購買年份:可以選1個月、12個月、24個月、48個月,購買月數不同擇價格不同、續費價格也不同(續費是要恢復原價的),所以如果你想買1個月體驗一下,就不划算了,不如直接買久一點,用著覺得不爽可以在30天內退款。 我買的是兩年(24個月),單價是39.99元/月(約6.21$),到期後續費是69.99元/月,雖然此處顯示的是人民幣,結帳時依舊是美元哦。
- 我一般不在主機處用免費功能變數名稱,此處是一年免費,後續還是要自己買的,如果你想要免費功能變數名稱,可以在頁面中輸入功能變數名稱搜索
- 點擊現在結帳

然後,我們進入註冊賬號頁面,下圖中的企業郵箱可以是個人郵箱

註冊帳號后,在選擇支付方式時,你可以選擇支付寶支付,但是是以美元結算,我選的是PayPal支付。


如果選的是PayPal支付,接下來你將看到下圖,顯示美元結帳金額。

付款完成後,等待系統返回到主機頁面,我們能看到下圖所示的嚮導,我們點擊start now按鈕繼續,它會引導我們進行操作。

如何按照Hostinger新手引導創建第一個網站
第一步是關於功能變數名稱的,有下圖中的3個選項:
- 主機贈送一年的免費功能變數名稱;
- 買一個新功能變數名稱。 如果購買功能變數名稱的話,我自己的操作是,非.cn功能變數名稱在功能變數名稱註冊商Namesilo或阿裡雲購買,不在主機處購買。
- 用自己已有的功能變數名稱。 ——這也是我選擇的方式,選擇后輸入功能變數名稱並提交。


接下來,我們能看到下圖,我們選擇是創建新網站還是網站搬家,請按需選擇,我這裡選的是創建新網站。

然後來到下圖,詢問我們是否有建站經驗,如果沒經驗的話,系統會給予引導,而我是有經驗的,所以我選擇了左側的yes,I have experience,我建議大家和我一樣選擇。

接下來,進入下圖,我們選擇網站程序類型,我選的是woocommerce,因為我以架設企業網站居多,如果是做資訊、博客等無產品的網站,可以直接選wordpress。

選完woocommerce后,我們輸入網站管理賬號的郵箱、生成隨機密碼(隨機密碼更安全)、然後點擊continue創建網站。

然後,我們能看到系統推薦的主題範本,目測都是Astra主題的免費範本,我的建議是先不選,直接點擊skip跳過,因為主題範本我們在網站管理後台可以再選的,可選擇的更多,

接下來,我們來到下圖,此處我們可以選擇網站的伺服器位置,選完后點擊finish setup即可。

最後,靜待網站安裝。

待安裝完成後,我看到了下圖,由於我的功能變數名稱是在阿裡雲的,我要去阿裡雲修改功能變數名稱的解析伺服器。

相關教學:如何修改網域伺服器:Namesilo、如何修改網域伺服器:Porkbun。
解析完成後,我們訪問網站,能看到網站已經能打開了,但網站的安全證書(SSL)還沒安裝,目前還是HTTP,我們需要安裝SSL證書,使得網站變成HTTPs。

Hostinger速度測試報告
結論:Hostinger的共用主機頂配(Business Shared Hosting)的速度測試結果良好。
測試網站:(1)預設站:我直接採用Hostinger預設安裝好的woocommerce網站,測試前,我先移除不必要的外掛。 (2)我自製的B2B企業網站範本
在Hostinger將WordPress網站安裝完成後,已經默認安裝了不少外掛程式:
- Google analytics、optinmonster:這兩個都是網站分析使用,不建議保留,我們直接用Google analytics官方查看數據分析即可,安裝GA我們直接用Elementor的 Custom code功能。
- All in one seo:SEO使用,我會換成Rank Math SEO
- All-in-one wp migration:網站搬入搬出使用,不要用就禁用、刪除
- WPForms Lite:詢盤表單製作用途,我會刪除這個外掛程式,因為免費版功能太少,我直接用Elementor製作詢盤表單)。
- Jetpack by WordPress:可以用於統計網站訪客、網站安全防護、速度優化,我一般用Wordfence和Cloudflare CDN,所以也會卸載掉。
- LiteSpeed Cache:緩存外掛程式,我將它與WP Rocket分別使用做了一下測速對比,發現還是WP Rocket比較好一些,而且更易用,LiteSpeed Cache的配置項好多好多好多啊…

同時,我啟用了主機後台中的advanced》cache manager的自動緩存。

接下來,我們進行速度測試。
KeyCDN TTFB測試
首先,我使用KeyCDN對預設站進行了TTFB(首位元節時間)的測試,測試結果如下:
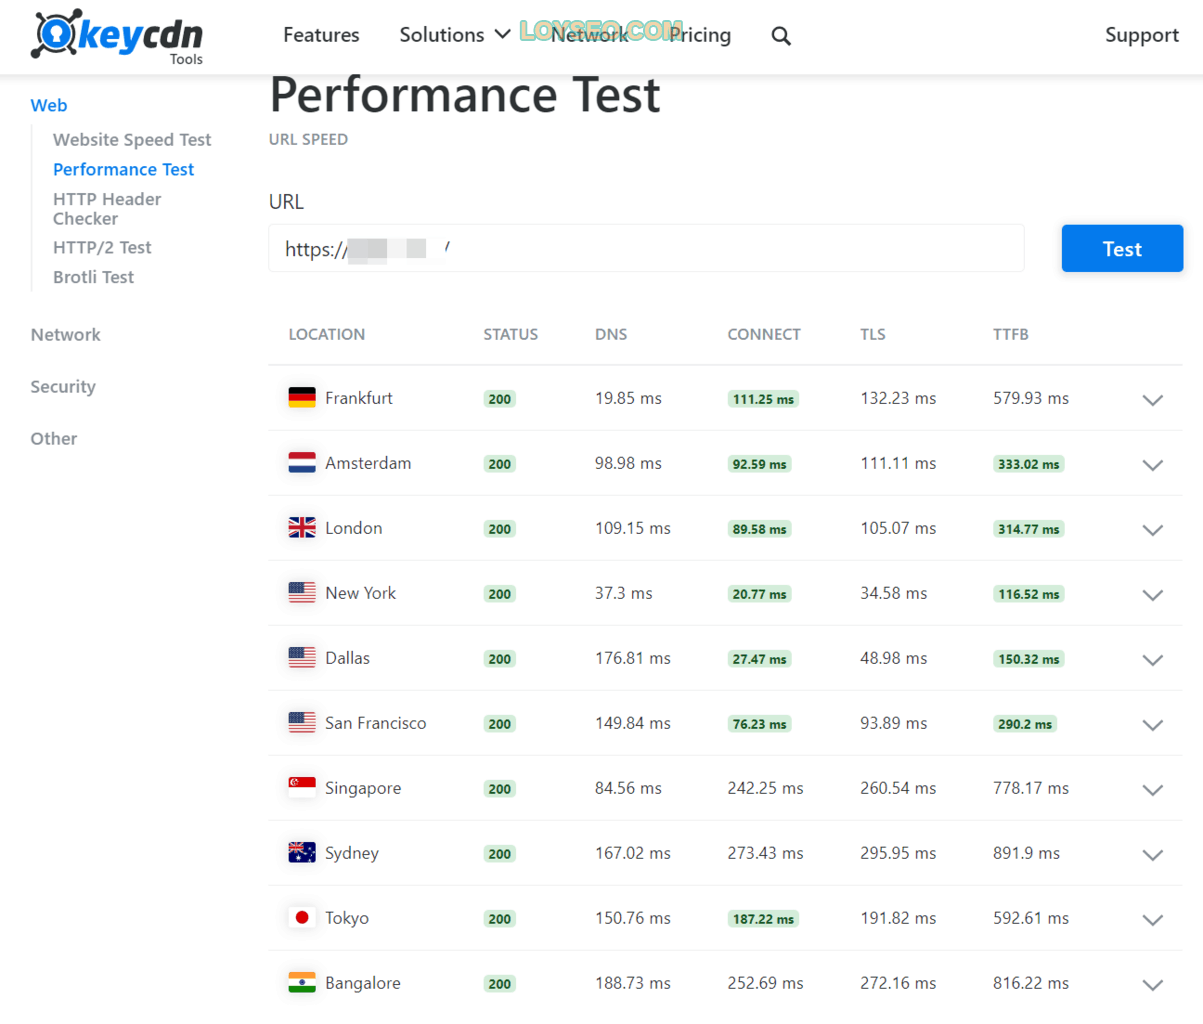

我測了4次,並記錄了如下TTFB(首位元節時間)數據,最下面一行是均值,這個數值是不如Cloudways的,跟SiteGround差不多。
| 579 | 125 | 481 | 471 |
| 333 | 109 | 345 | 419 |
| 314 | 105 | 324 | 632 |
| 116 | 33 | 118 | 203 |
| 150 | 88 | 146 | 146 |
| 290 | 137 | 298 | 503 |
| 778 | 300 | 804 | 1120 |
| 891 | 574 | 850 | 1040 |
| 592 | 254 | 601 | 591 |
| 816 | 330 | 804 | 901 |
| 485.9 | 205.5 | 477.1 | 602.6 |
Fastorslow速度測試
我使用Fastorslow對默認網站進行了測試:

也使用我的B2B外貿企業範本站進行了測試(配置的緩存外掛是WP Rocket)

Google PageSpeed速度測試
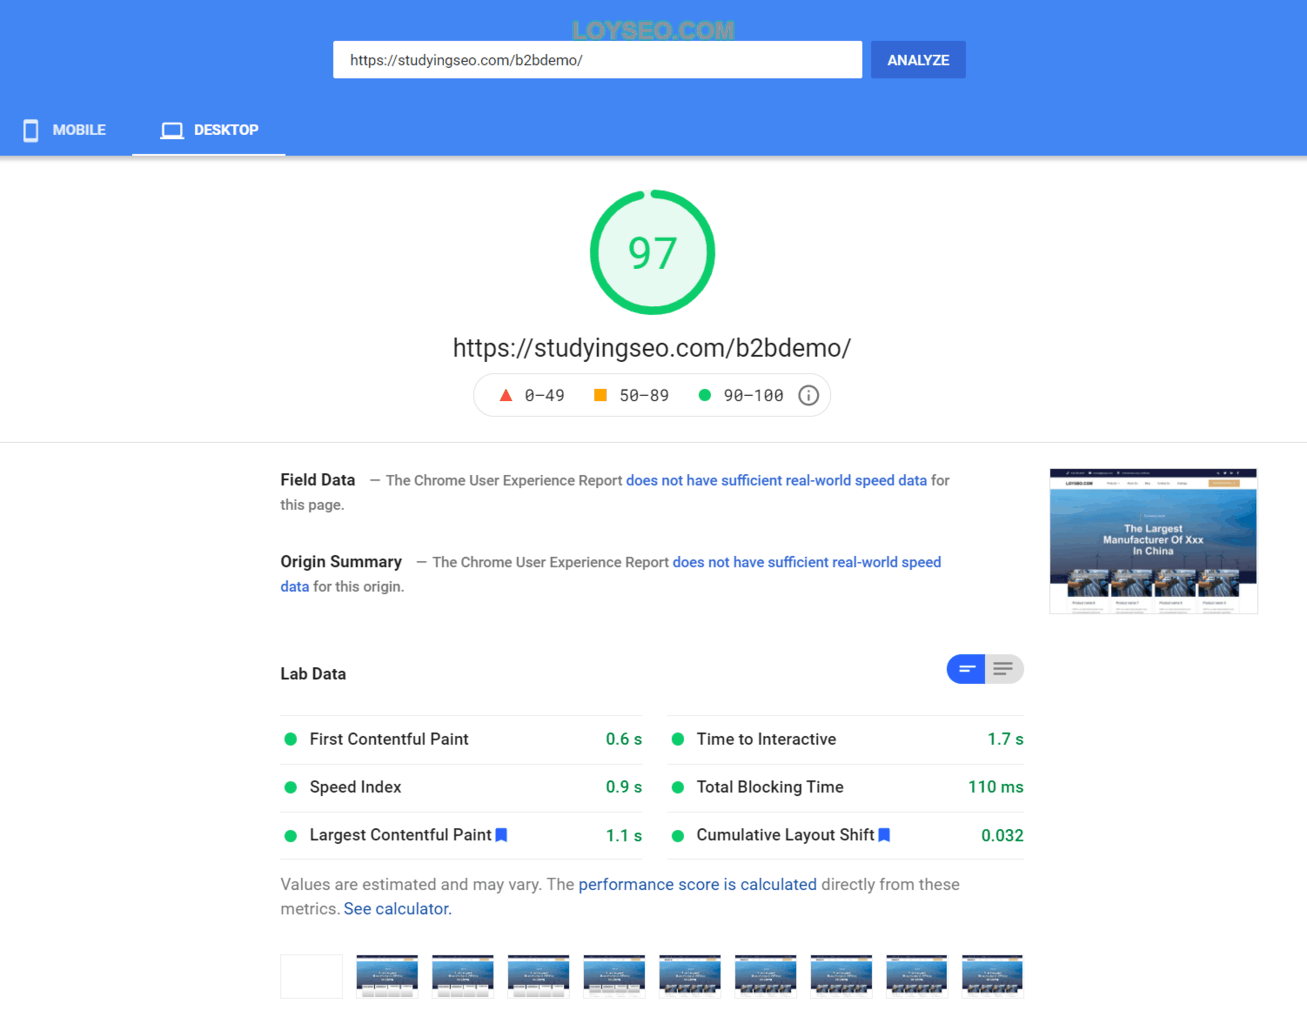
使用Google PageSpeed對我的外貿企業範本站進行了測試(配置的緩存外掛是WP Rocket),結果如下:

GTmetrix速度測試
使用GTmetrix對我的外貿企業範本站進行了測試(配置的緩存外掛是WP Rocket),結果如下:


Pingdom速度測試
使用Pingdom對我的外貿企業範本站進行了測試,結果如下:


下圖是我用pingdom進行的長期速度監測的部分數據,載入時間也是良好的。

Hostinger的正常運行時間是多少?
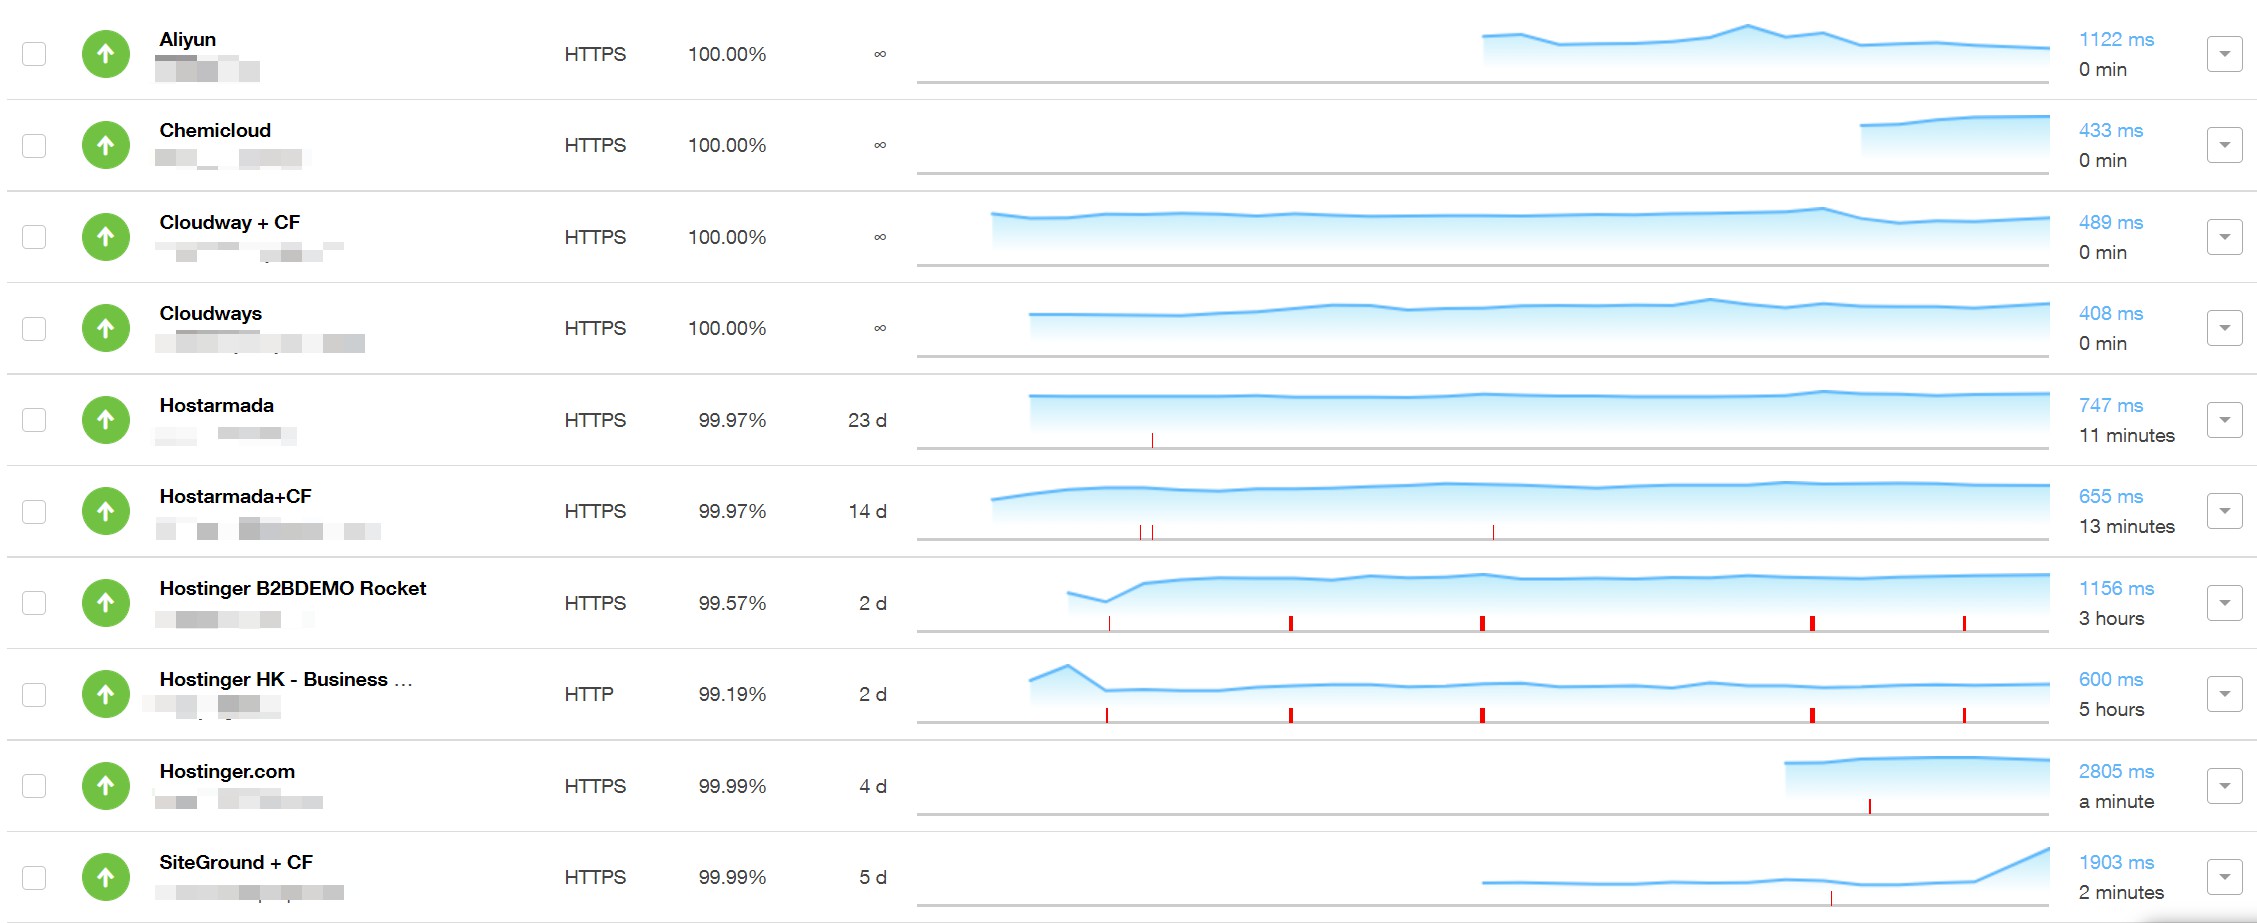
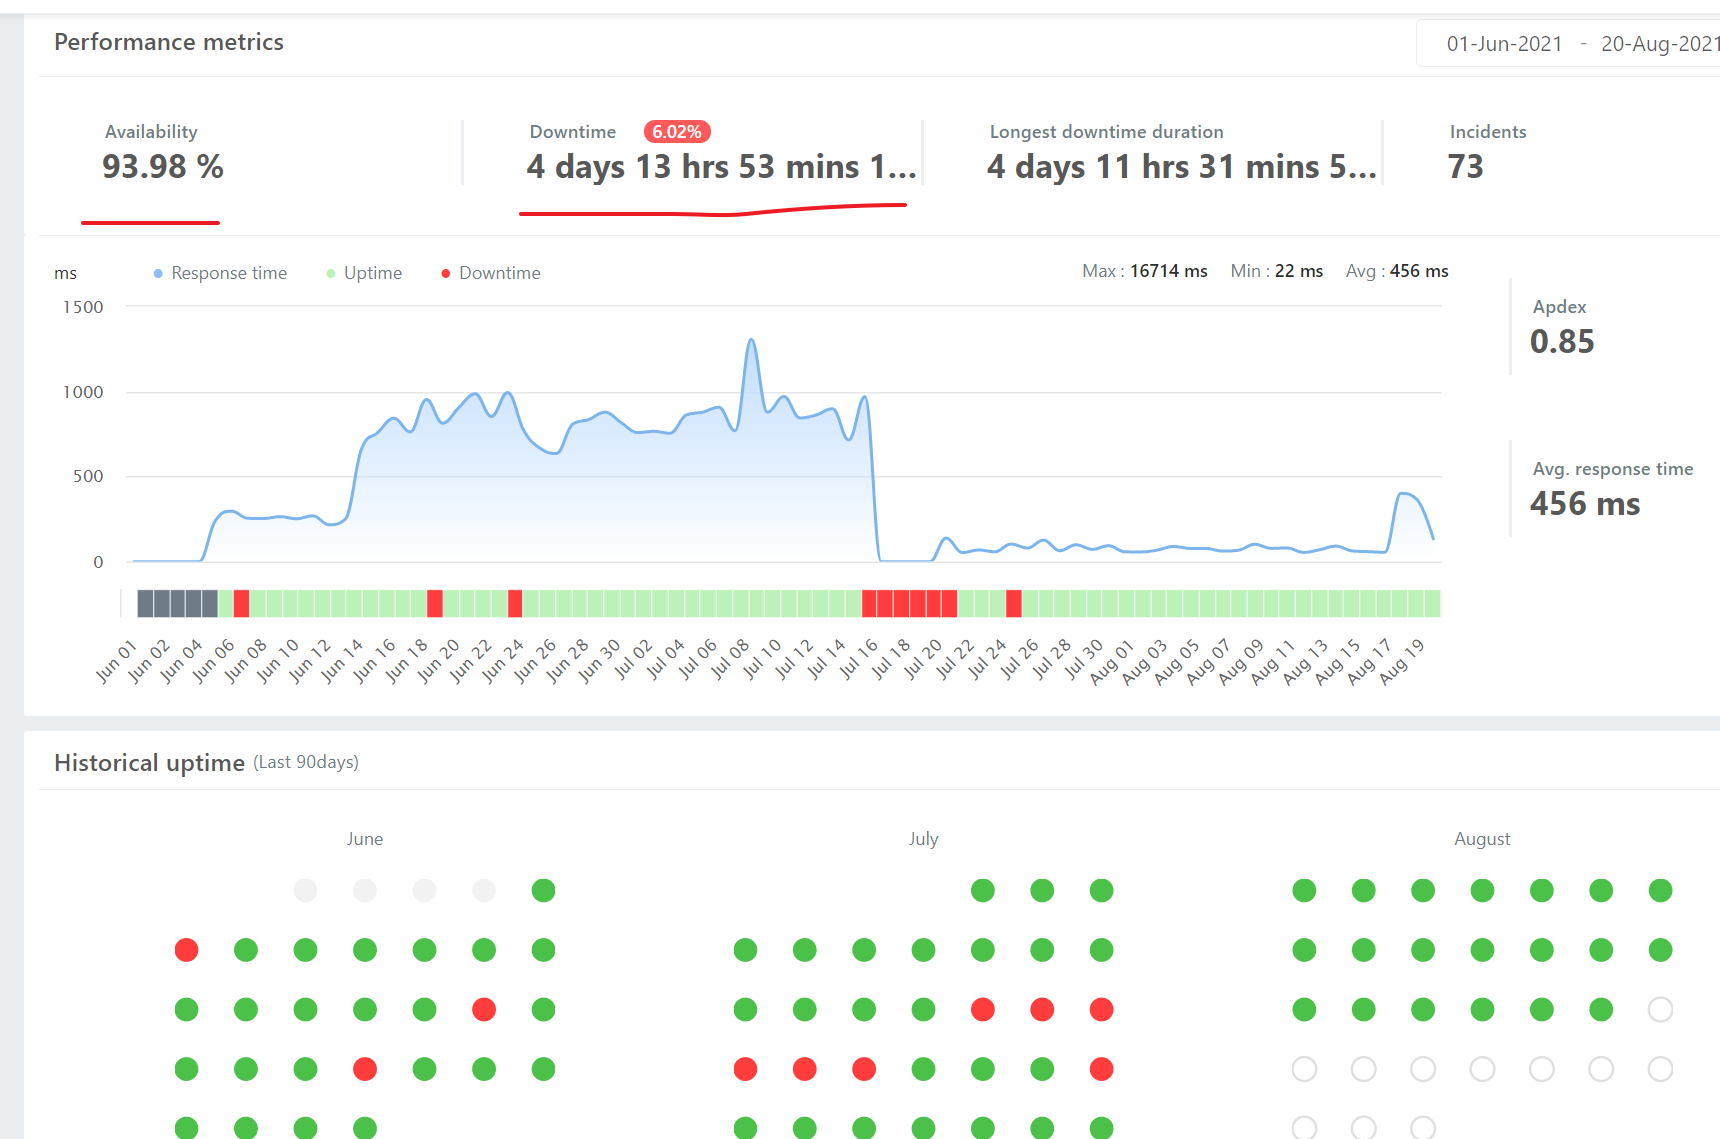
我購買的是 Hostinger.com.hk 的主機,測試出來的正常運行時間是我所用的主機里最差的。 這個數據監測需要時間,過幾個月我再更新一次,但從目前下圖將近一個月的數據看來,正常運營網站就要慎重考慮要不要用 Hostinger.com.hk 的主機了,此外,我還在監測 Hostinger.com 的主機的正常運行時間情況,數據以後再更新進來。
2021年8月20日更新:
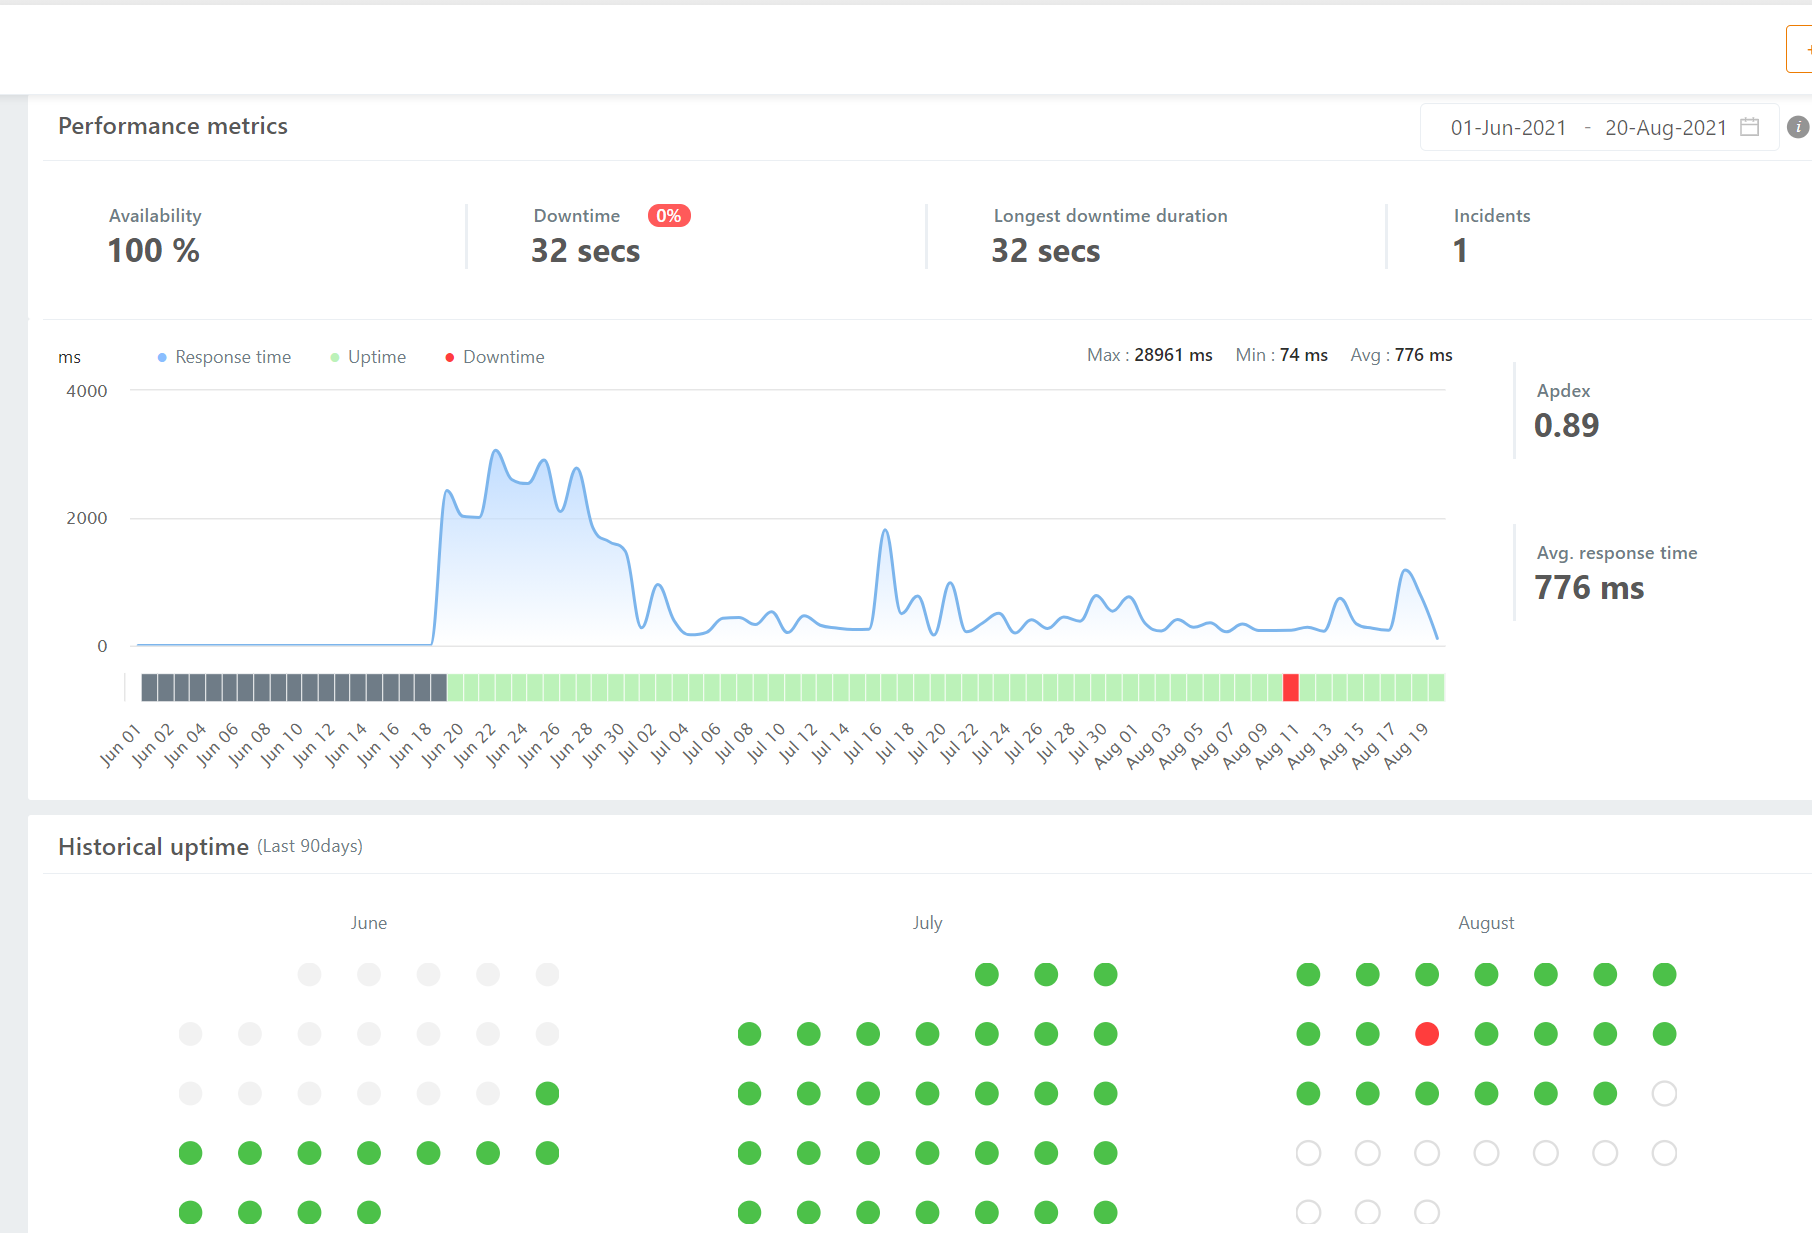
下圖是從 Hostinger.com.hk 購買的 WordPress商業 套餐,慘不忍睹的掉線頻次和時長。 但是 Hostinger.com 購買的 Business Shared Hosting 套餐的正常運行時間卻很好。
Hostinger的大眾評價如何?
基於國外大眾點評的TrustPilot,Hostinger的評分是4.4/5,5星好評佔比84%,1星差評佔比8%,SiteGround是4.7、92%、5%,Cloudways是4.8、90%、6%。


Hostinger的客服回應速度
當你已經成為Hostinger使用者並登陸后,頁面右下角有個客服聊天視窗,點擊它便能聯繫客服,從下圖的客服面板中,能看到能得到應答的時間是30分鐘,有的時候是1個小時,這個回應的時間是有點長哦~之前我買過一個小眾一點的貴3倍的主機(WPX),能在1分鐘內應答。 由於我本身也不咋找客服解決問題,這個客服回應時長對我而言並不重要~

我正好遇到一個問題聯繫了客服,介面提示我一個小時內回復,實際大約十來分鐘回復我了。
如何通過Hostinger面板進入網站管理後台
在hostinger主機面板的wordpress > dashboard中,我們能點擊下圖中的edit website免密登錄你的網站後台。
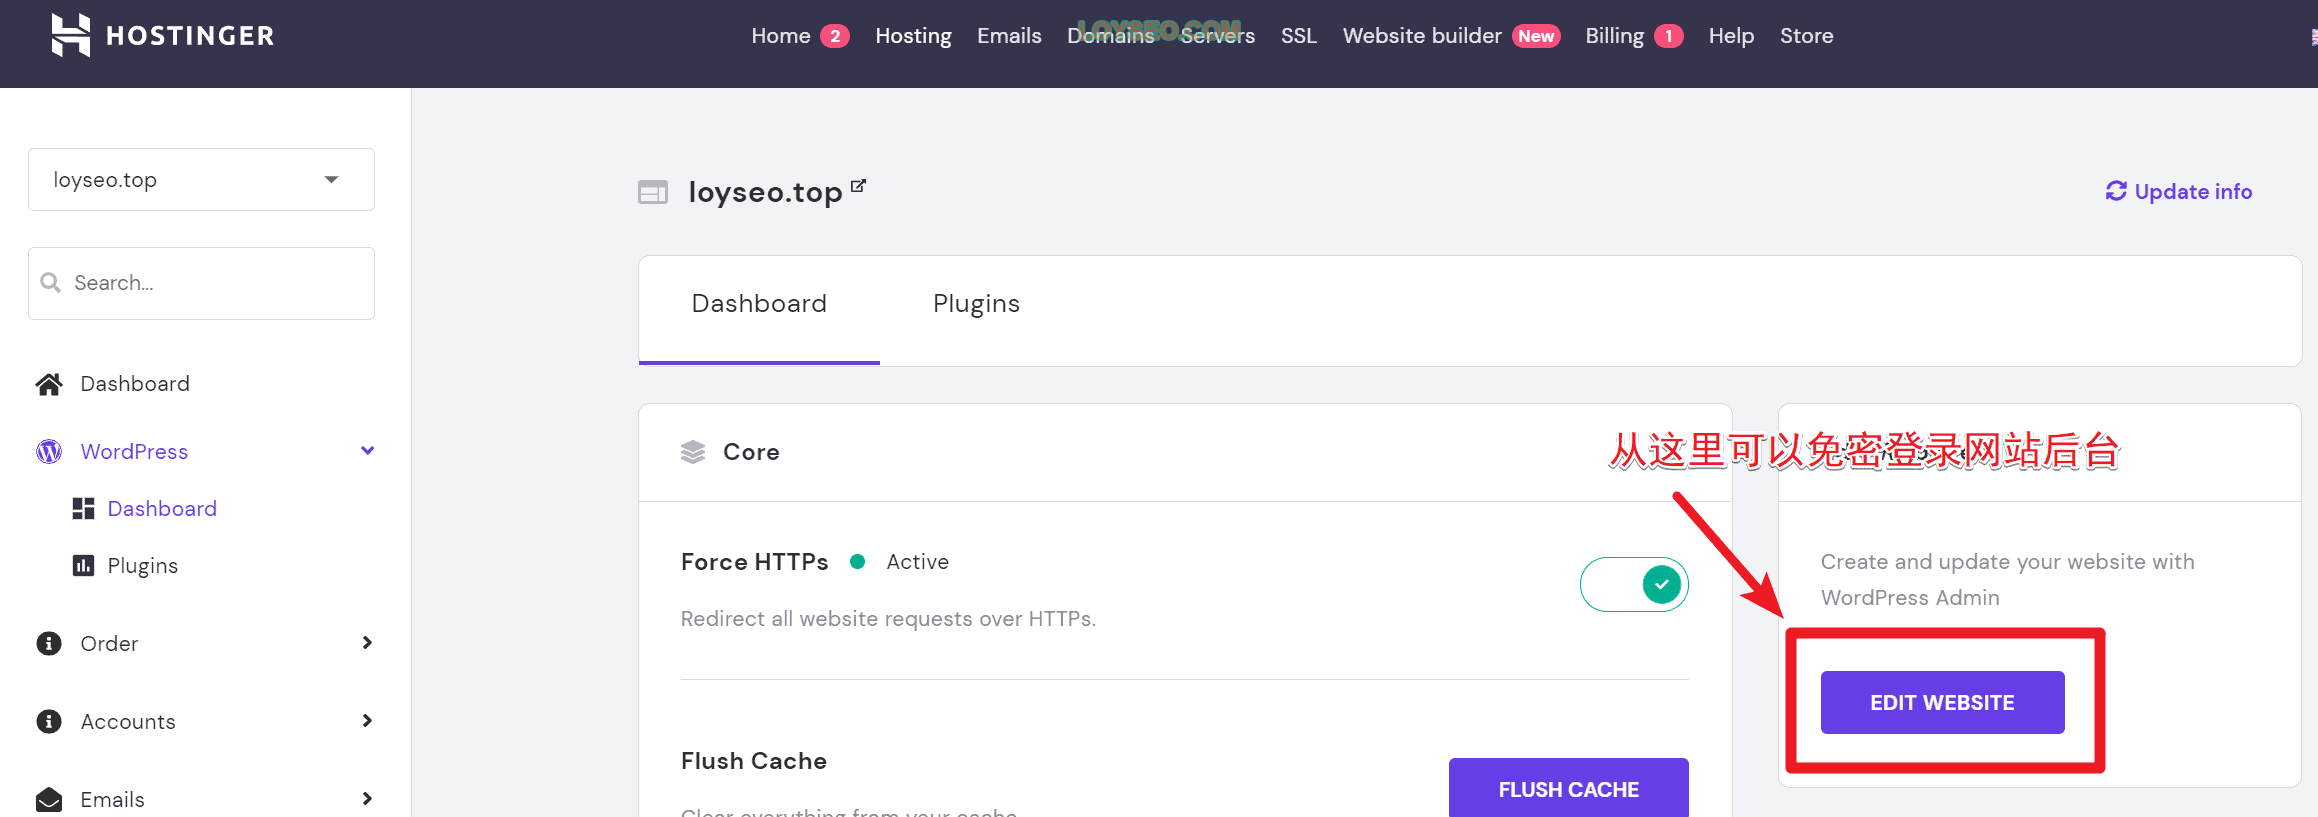
如果點擊Edit Website出現下圖所示錯誤,那就過會兒再多試幾次。

你也可以直接通過訪問 https:// 你的功能變數名稱/wp-admin/打開網站登錄頁面,然後輸入上文中創建網站時輸入的郵箱、密碼來登錄。
接下來如果你需要創架設網站,可以查看我的兩篇架設網站教學:
如何在Hostinger安裝SSL證書
進入hostinger主機的面板后,我們點擊左側菜單的wordpress》dashboard,便能看到如下圖所示的內容,在force HTTPs欄目,點擊下圖的開關。

然後會出現彈出窗,我們點擊install ssl

等待安裝完成後,我們繼續在dashboard裡打開開關即可,此時訪問網站就是HTTPs開頭的啦。

此外,你也可以在Advanced> SSL頁面中安裝證書。

如何在Hostinger創建新網站
在已有功能變數名稱下創建子功能變數名稱網站
子域名是指 xxx.domain.com,子目錄是指 domain.com/xxx
第1步,在Domain>subdomain中添加子域名

第2步,在WordPress>Dashboard頁面底部位置點擊Install按鈕

第3步,點選網站類型,我們通常選擇WordPress

第4步,在安裝彈窗中,如下圖所示輸入網站資訊並點擊安裝即可

然後我們便可以在頁面中看到添加的網站了,在操作中點擊manage便可進入該網站的管理面板。

下圖便是新網站的管理面板

然後,你還要為子域名網站添加SSL證書,請進入Advanced>SSL頁面進行安裝。

在已有功能變數名稱下創建子目錄網站
在website>auto installer頁面中,點選wordpress的select創建網站

在安裝面板中,我們在功能變數名稱後方的輸入框內輸入子目錄,譬如常見的創建多語言網站,我們可以添加en、cn等區別國家進行建站,然後填寫網站密碼、名稱、語言提交即可。

如果創建的是子目錄網站的話,如果主站已經添加了SSL證書,此處就不需要給子目錄網站再添加SSL證書了。
創建一個新域名網站
創建新域名網站有多個入口,譬如Hosting頁面中的Add website按鈕

又或是在已有網站的儀錶盤中,點擊功能變數名稱的下拉選項中,也有add website按鈕

點擊add website按鈕,都將進入下圖頁面(Domains> Add website),在該頁面輸入你的新域名及密碼,點擊提交即可。

注意,建議你將新功能變數名稱的功能變數名稱伺服器更換為主機的功能變數名稱解析伺服器哦,不然使用主機管理面板管理當前網站時,會發現有些功能入口被隱藏,不過,如果你能夠在功能變數名稱解析處用A解析記錄指向主機(如下圖所示,我將 demo.loyseo.cn 指向了主機的伺服器IP),也能夠正常建站,只是比起用主機直接託管功能變數名稱解析伺服器要麻煩一些。

如何在Hostinger中刪除網站
請進入Hosting → Manage:
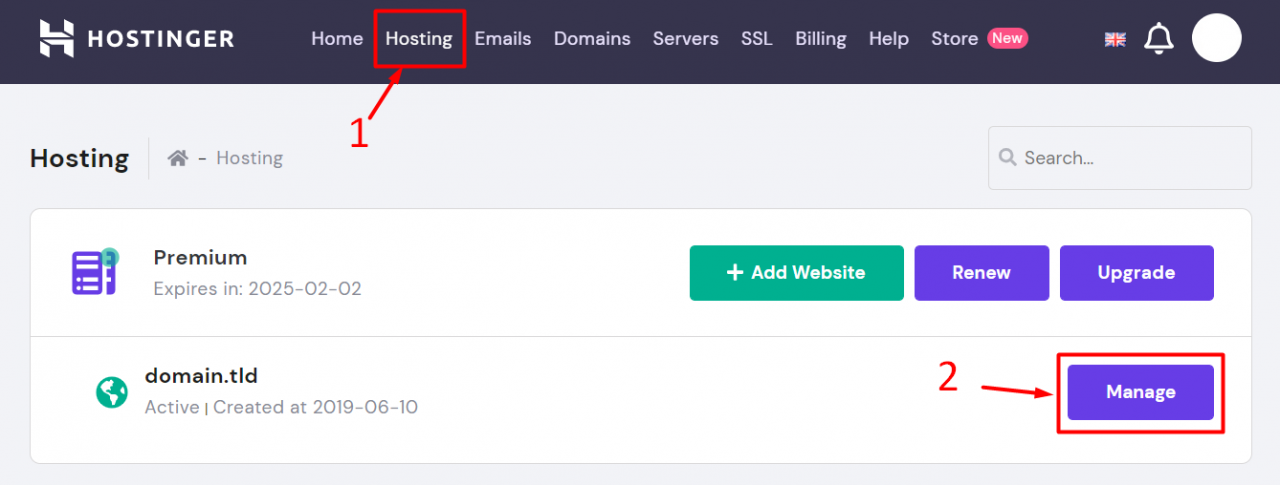
在管理面板中,您將看到Add website,點擊進入。

然後選擇您要刪除的功能變數名稱,然後按下Delete:
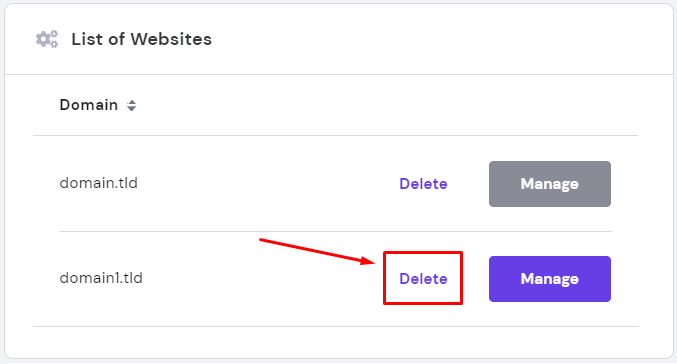
按兩下刪除後,您將看到一條警告,請務必仔細閱讀,以瞭解從主機中刪除網站的後果。
請記住,此操作是不可逆的,所有檔、資料庫、電子郵件和任何配置都將丟失。
如果您在刪除網站之前需要備份,請務必事先下載它們。 完成後,按兩下Delete add-on即可。
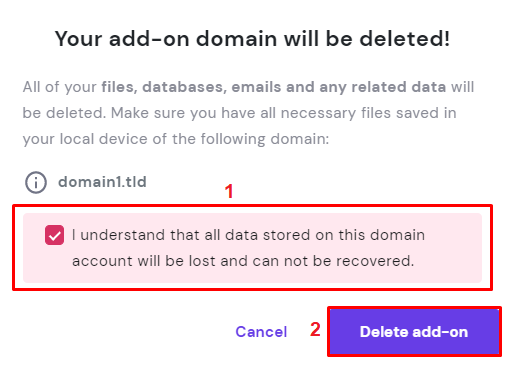
注意:
- 如果您要刪除主機帳戶的主功能變數名稱,需要先設置一個新的主功能變數名稱。 否則,整個主機帳戶將都被移除。
如何刪除子域名網站
如果你的一個網域下創建了多個網站,需要刪除某個的話,在菜單website>auto installer下可以刪除網站。

如何刪除主域名網站
如果你需要刪除整個功能變數名稱及其網站,那麼按照下圖所示,在domain> add website頁面中對域名進行delete即可。

如何修改HOSTINGER中的主功能變數名稱
如果你想在Hostinger中更換主功能變數名稱(Main domain),就按照下面的步驟操作。
第1步,進入想要設為主網域的管理介面,菜單是:主機(Hosting)→管理(Manage)

第2步,找到set main domain按鈕,點擊進入。

然後,在網域的下拉列表中,選擇想要設為主網域網域即可。 注意:設置主網域后只是重命名您的主機帳戶,它對網站檔沒有影響。
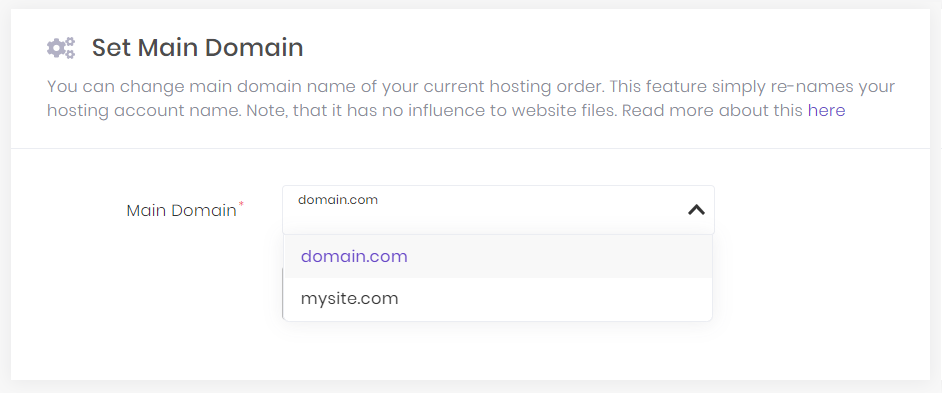
如果您不再需要舊域名了,您還可以繼續進入管理面板,然後找到Add website,點擊進入

進入后,找到舊功能變數名稱,點擊刪除按鈕
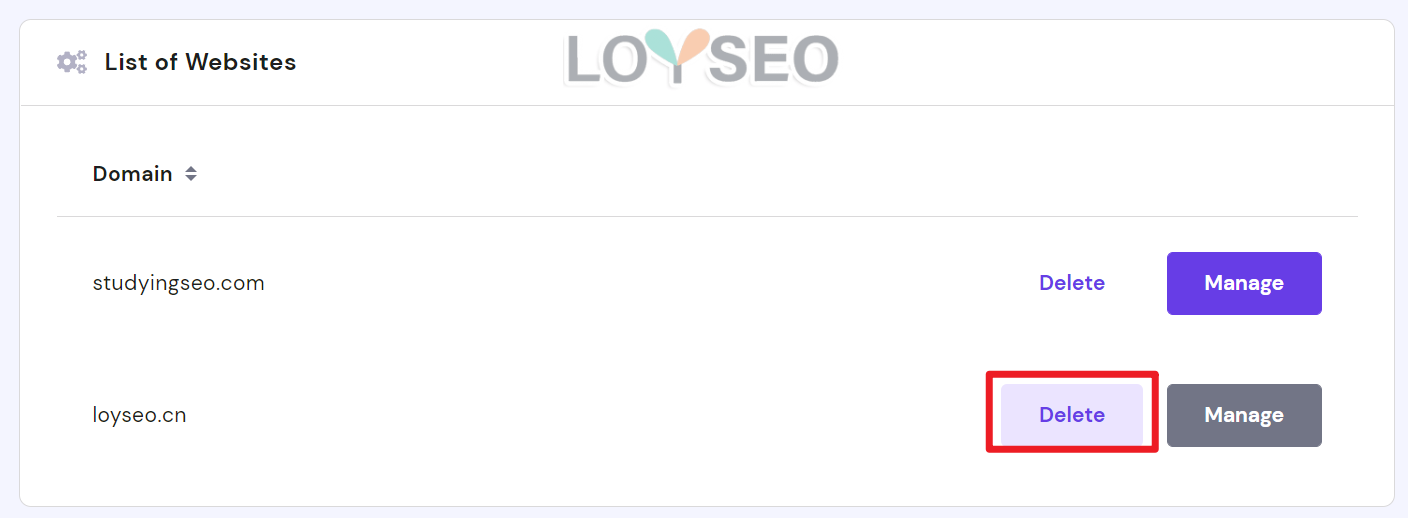
如何在Hostinger開通Cloudflare CDN
在Hostinger面板中,點擊左側菜單Domains》cloudflare進入,然後點擊下圖中的setup。

接下來輸入你的郵箱,點擊install cloudflare后,按系統提示輸入密碼。

待帳號密碼通過後,能看到如下提示,此時點擊manage cloudflare。

然後你就會看到下圖所示的頁面,此時按照下圖配置將service status開啟,將ssl設為full(strict)。

如何在Hostinger備份與還原網站
在網站的管理面板中,菜單File>backups便是進行備份與還原的功能。 注意,此處的備份分為了資料夾和資料庫備份,所以如果你要完整還原網站的話,需要分別進行資料夾還原和資料庫還原,此外,generate new backup

首先,我們還原資料夾


待資料夾還原完成後,我們點選資料庫進行還原
首先,按下圖所示找到待還原的網站的資料庫名稱

然後,我們在備份頁面進行資料庫還原


最後,你還可以在備份頁面查看還原的歷史記錄

Hostinger的手動備份功能無法使用?
我自己嘗試用了generate new backup功能,發現提示我24小時只能創建一份備份,但是我的套餐是每24小時就自動創建一份備份的,於是就尷尬了,我是無法自己創建備份的,於是我就去找了客服諮詢。

結果就是:對於擁有每日自動備份套餐的我,這個功能沒有任何用處,想要手動備份的話,我決定用外掛程式UpdraftPlus WordPress Backup Plugin來解決,通常我實在升級網站時才會需要臨時手工備份。

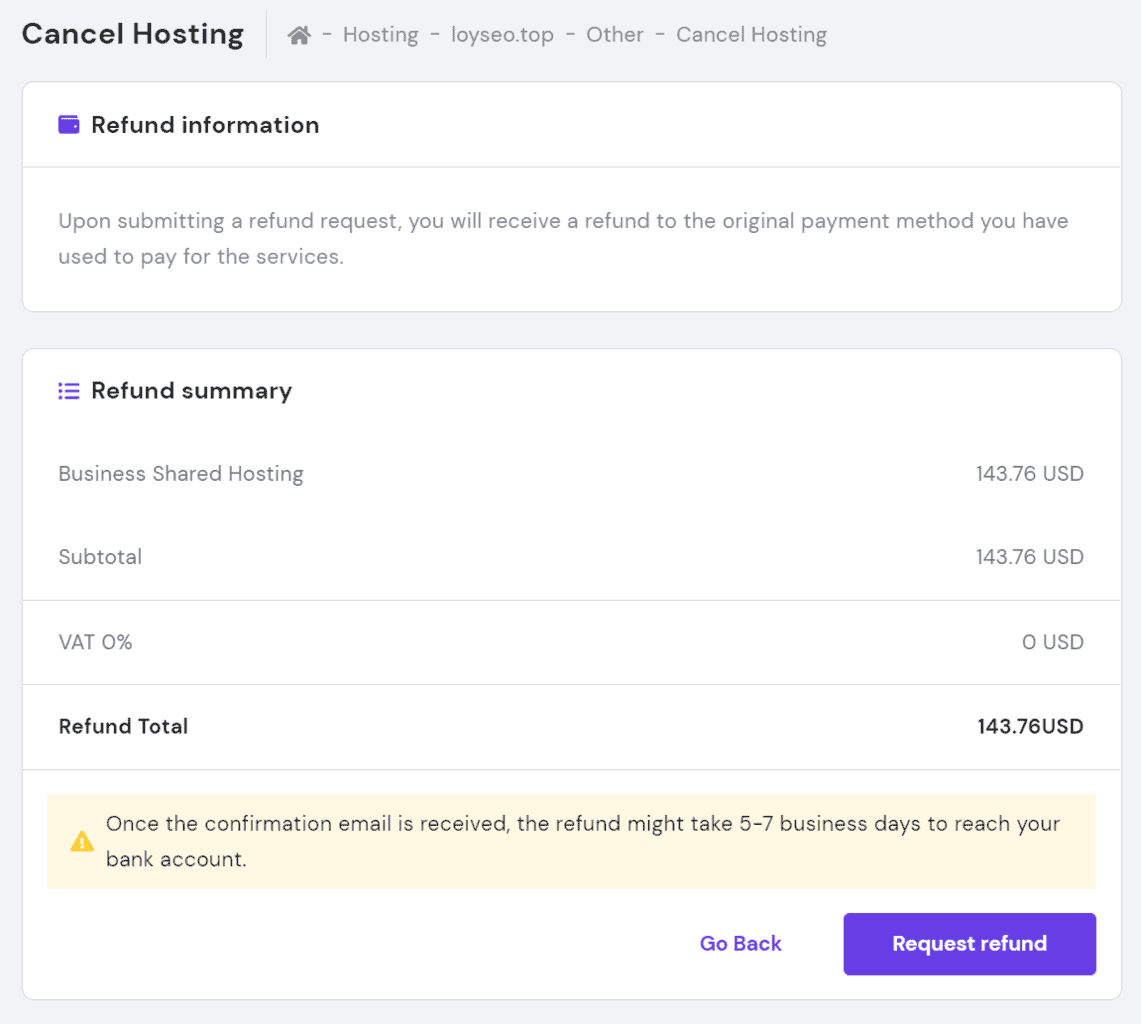
如何在Hostinger退款
我在本文開篇說了我買了兩台主機,第一次買的是 hostinger.com 的business shared hosting,之後又發現 hostinger.com.hk 的便宜一些,於是就又買了business wordpress主機,所以我要退掉其中一個。
退款的方法如下:請在面板中找到Deactivate Account

點擊菜單進入後,按介面提示逐步填寫退款申請即可,在購買后30天內退款都是全款退的,只是如果你使用了主機提供的免費網域,會扣除網域費用哦,因為網域本質上是主機方買的,且網域是無法退款的。
